Monday, December 6, 2021

Bathroom Tub Shower Tile Ideas

Bathroom Tub Shower Tile Ideas

  • Bathroom

Quick Tip: Laying Bathroom Tile

Successfully laying bathroom tile requires careful planning.

How to Tile a Bathroom, Laying Bathroom Tile

Photo: Flickr

While many people consider laying bathroom tile a do-it-yourself project for money-saving reasons, there are many factors that can make or break the job. This quick guide shows you how to tile a bathroom correctly.

Bathroom Tile Installation
Once you've determined the type of tile you need, think about how it will be installed. The substrate, or what tile is installed on top of, is just as important as the tile itself. A flexing floor or a wall that is uneven can lead to broken tiles and failed grout.

Water-resistant backer board, not drywall, should be used under the tile that will get wet. Whether it's backer board, plywood or concrete, the substrate needs to be sound, clean and dimensionally stable. Surfaces need to be level or plumb and true to plane, as the pros say. That means no bumps.

Any cracks or voids can compromise even the best tile job. The only way to be sure the tile sticks fast is to use a notched trowel to apply adhesive to the substrate.

Create Space
The space between the tiles should be uniform, so use spacers if your tiles don't come on mesh sheets. The larger the tile, the larger the space should be between them. Some do-it-yourselfers will make the mistake of pushing tiles too close together to reduce grout lines. Without enough surface area, grout won't bond well and can fail prematurely, leaving room for leaks and water damage. It's also very important to let the adhesive cure fully.

Follow Instructions
Follow the manufacturer's instructions and stay off the installation the required amount of time before you grout the tile.

Bathroom Tub Shower Tile Ideas

Source: https://www.bobvila.com/articles/282-quick-tip-laying-bathroom-tile/

Share:

Bathroom Art Work

Bathroom Art Work

Beautiful bathroom art ideas add decorative elements to zones that were previously ignored.

Creative bathroom ideas that feature artwork are having something of a moment, as we all begin to view every room in our home as a living space rather than purely functional.

While bathrooms are perhaps the last place you'd consider hanging artwork – the steam, the moisture, the potential splashes – we love the thought of a boutique hotel-inspired ensuite or master bathroom that allows you to enjoy a favorite piece of art while relaxing in the tub.

These are just some of our bathroom art ideas and we've added a few tips at the bottom about what not to do when displaying art in the bathroom.

Bathroom art ideas

The bathroom art ideas and bathroom pictures below are mostly of paintings, pictures and wallpaper. However, sculpture can be very effective in a bathroom, too, especially if well-lit.

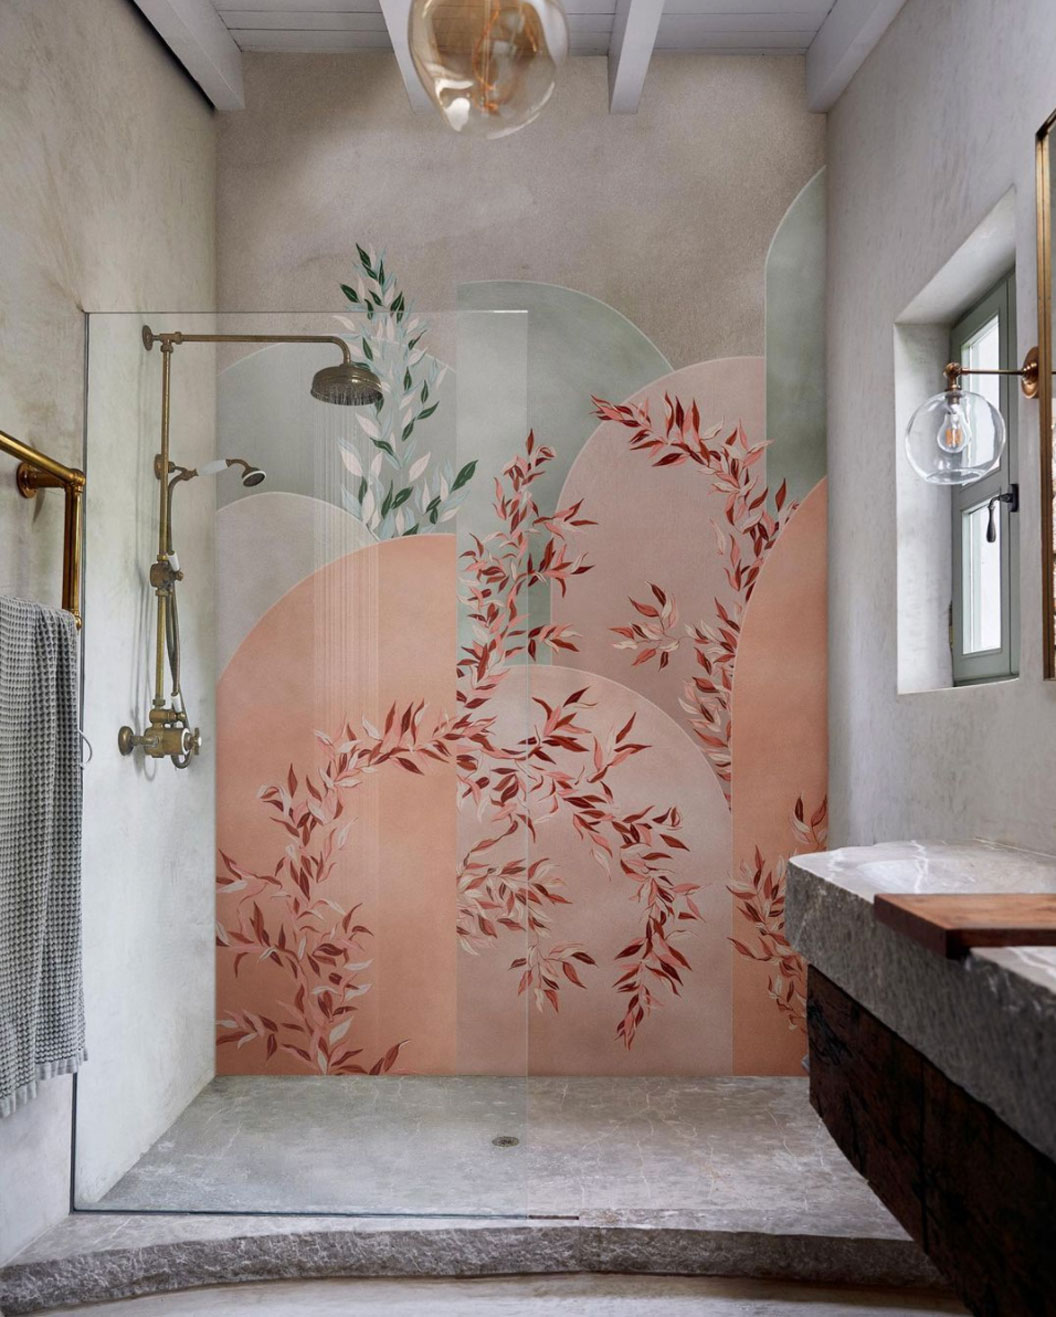
1. Turn a shower cubicle into bathroom art with wallpaper

An example of bathroom art ideas showing waterproof pink floral wallpaper in a shower

(Image credit: Wall&decò)

Looking for bathroom art ideas AND an alternative to mildew-prone grout lines? We have an extraordinary solution that will change the way you approach bathroom decor forever.

'Wall&decò's waterproof wallpaper can be installed directly inside the shower, providing a seamless surface that's low maintenance, easy to clean and perfect for making a bold statement,' says Kirsten Wain, designer at West One Bathrooms.

'The wallpaper can also be applied over existing tiles, making it great for a quick update with minimal mess or disruption.'

Shown in the walk-in shower idea above is Wall&decò's Vivido waterproof wallpaper.

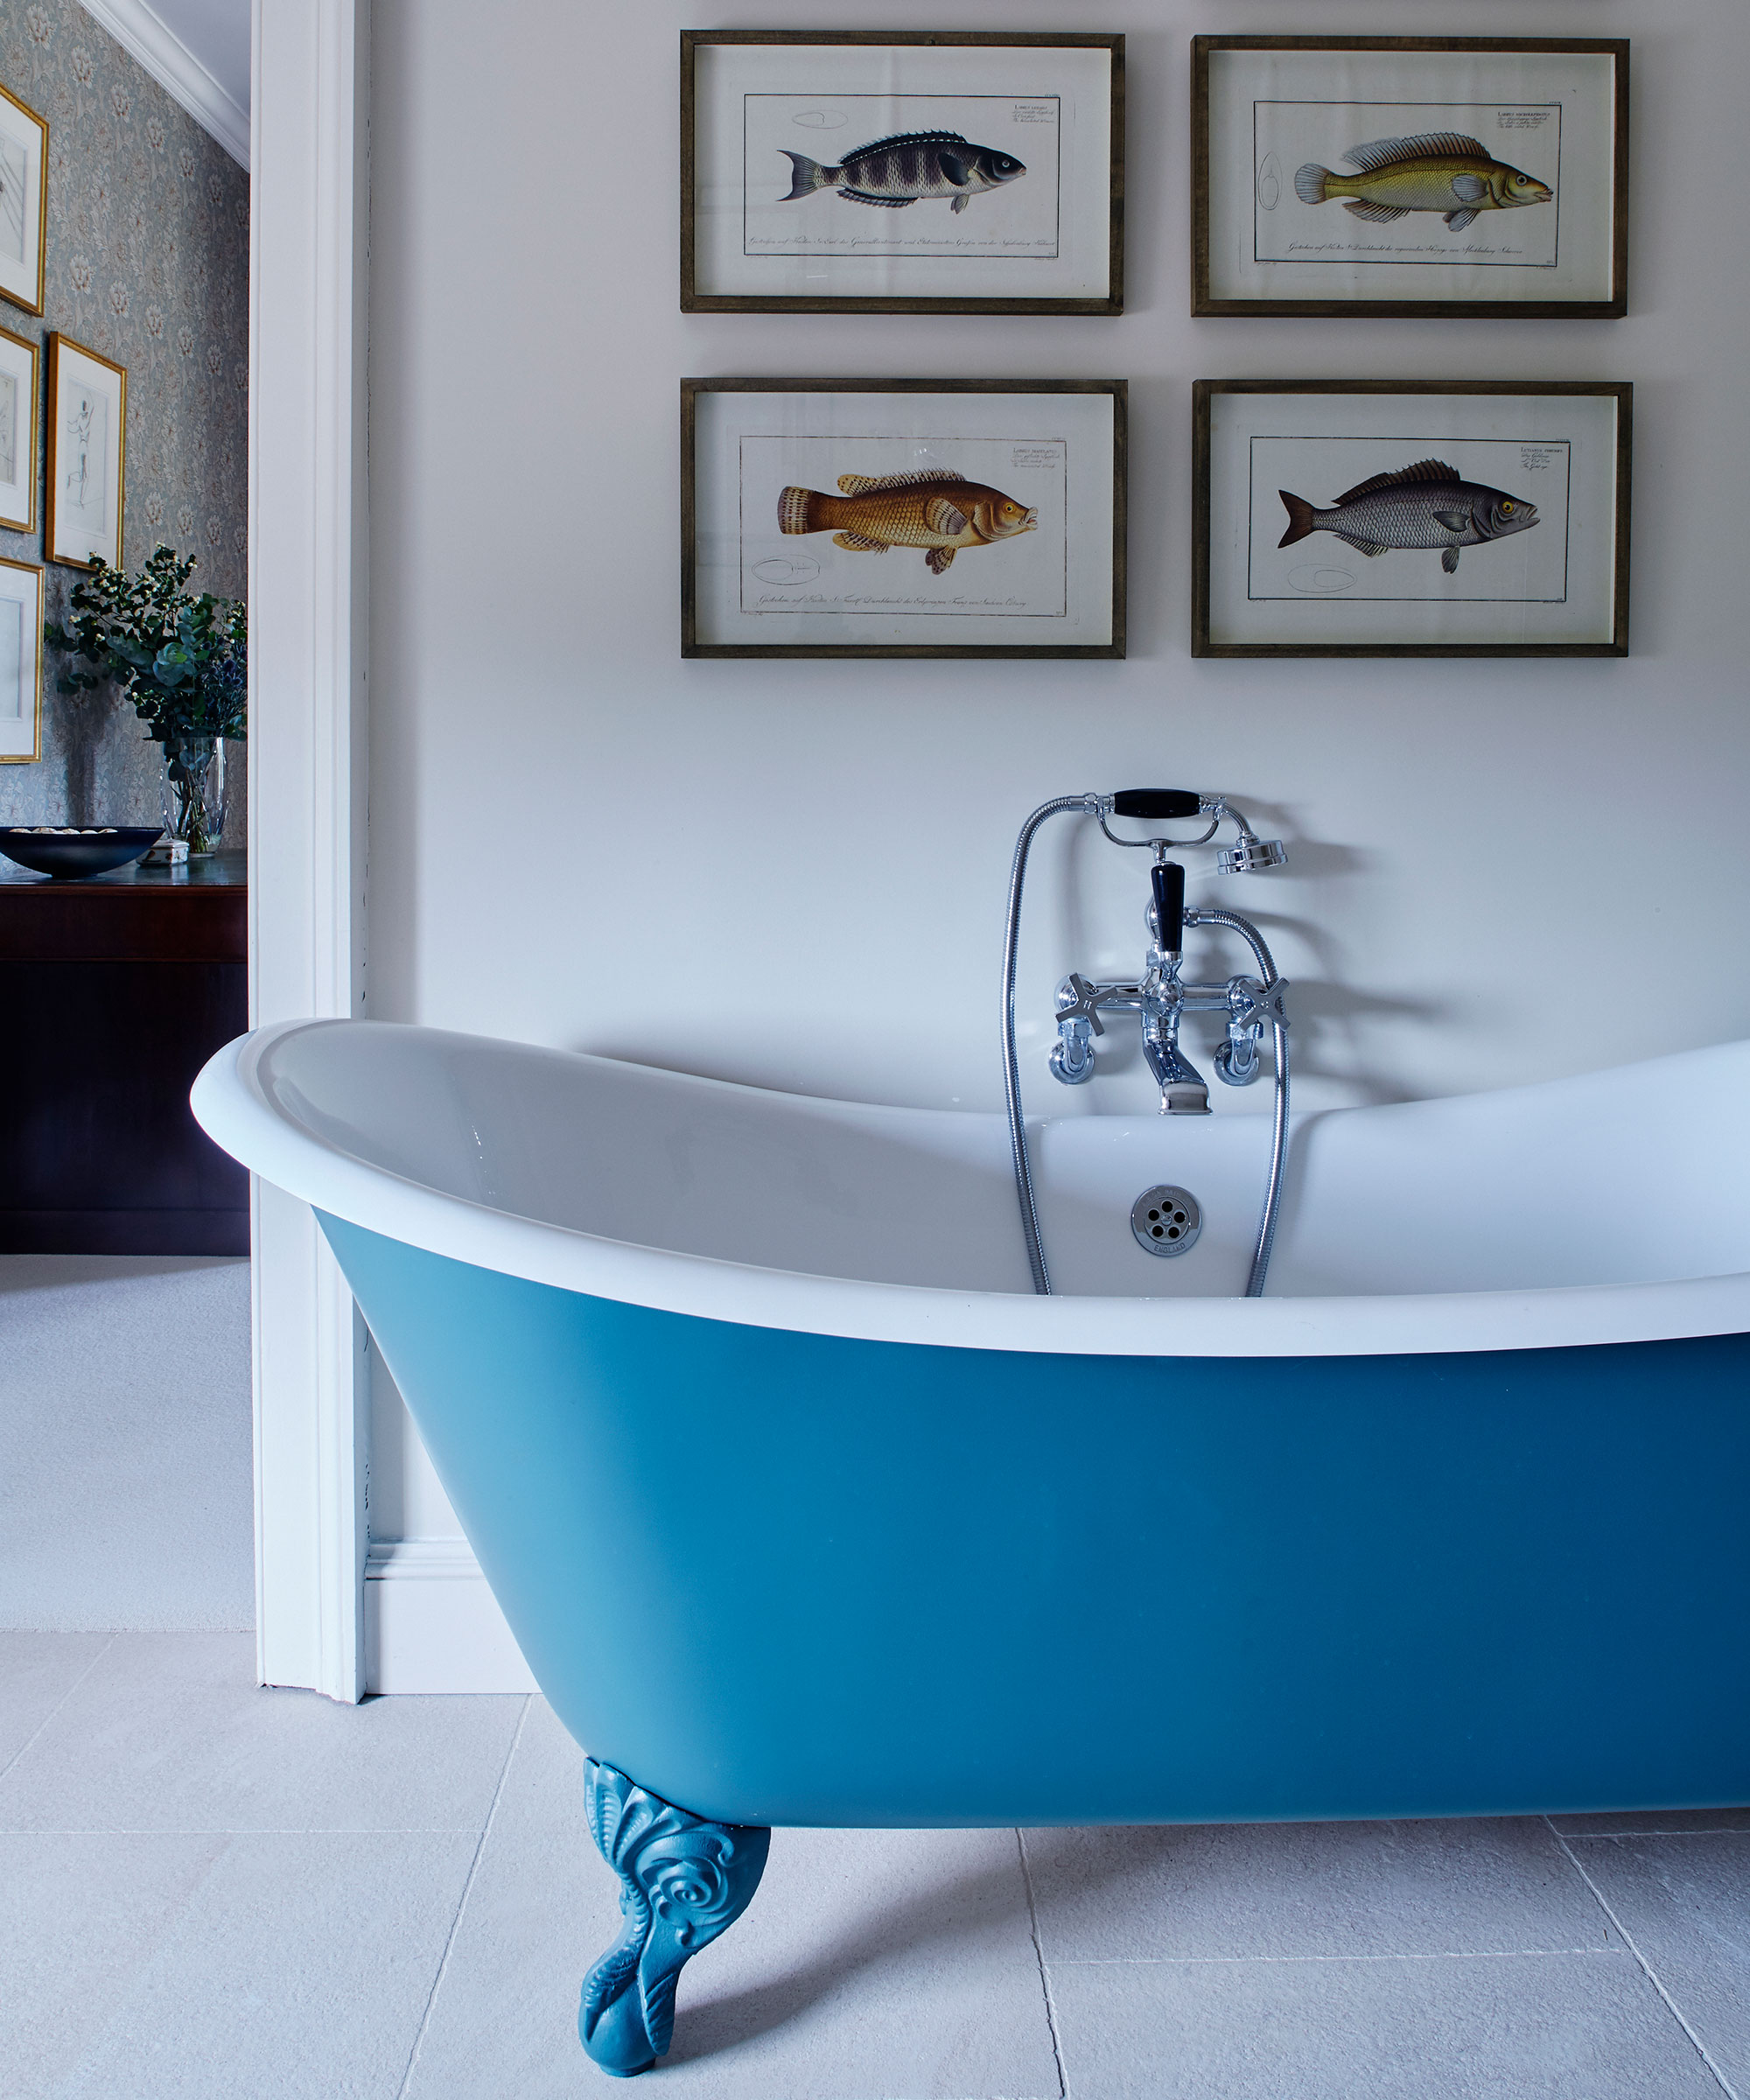
2. Use art to add instant personality

A blue free standing bath with four pictures on the wall above

(Image credit: Brent Darby/Future plc)

'The bathroom is often seriously under-served when it comes to adding style and personality,' says Owen Pacey, founder of restoration company Renaissance London.

'A great way to start is with art. Hang framed prints and introduce sculptures to give the often-neglected space a unique feel.

'Start by choosing one piece you love that works well in the space, and go from there. Perhaps you could build up a gallery wall above a bath, or stick with one statement piece to really draw the eye.'

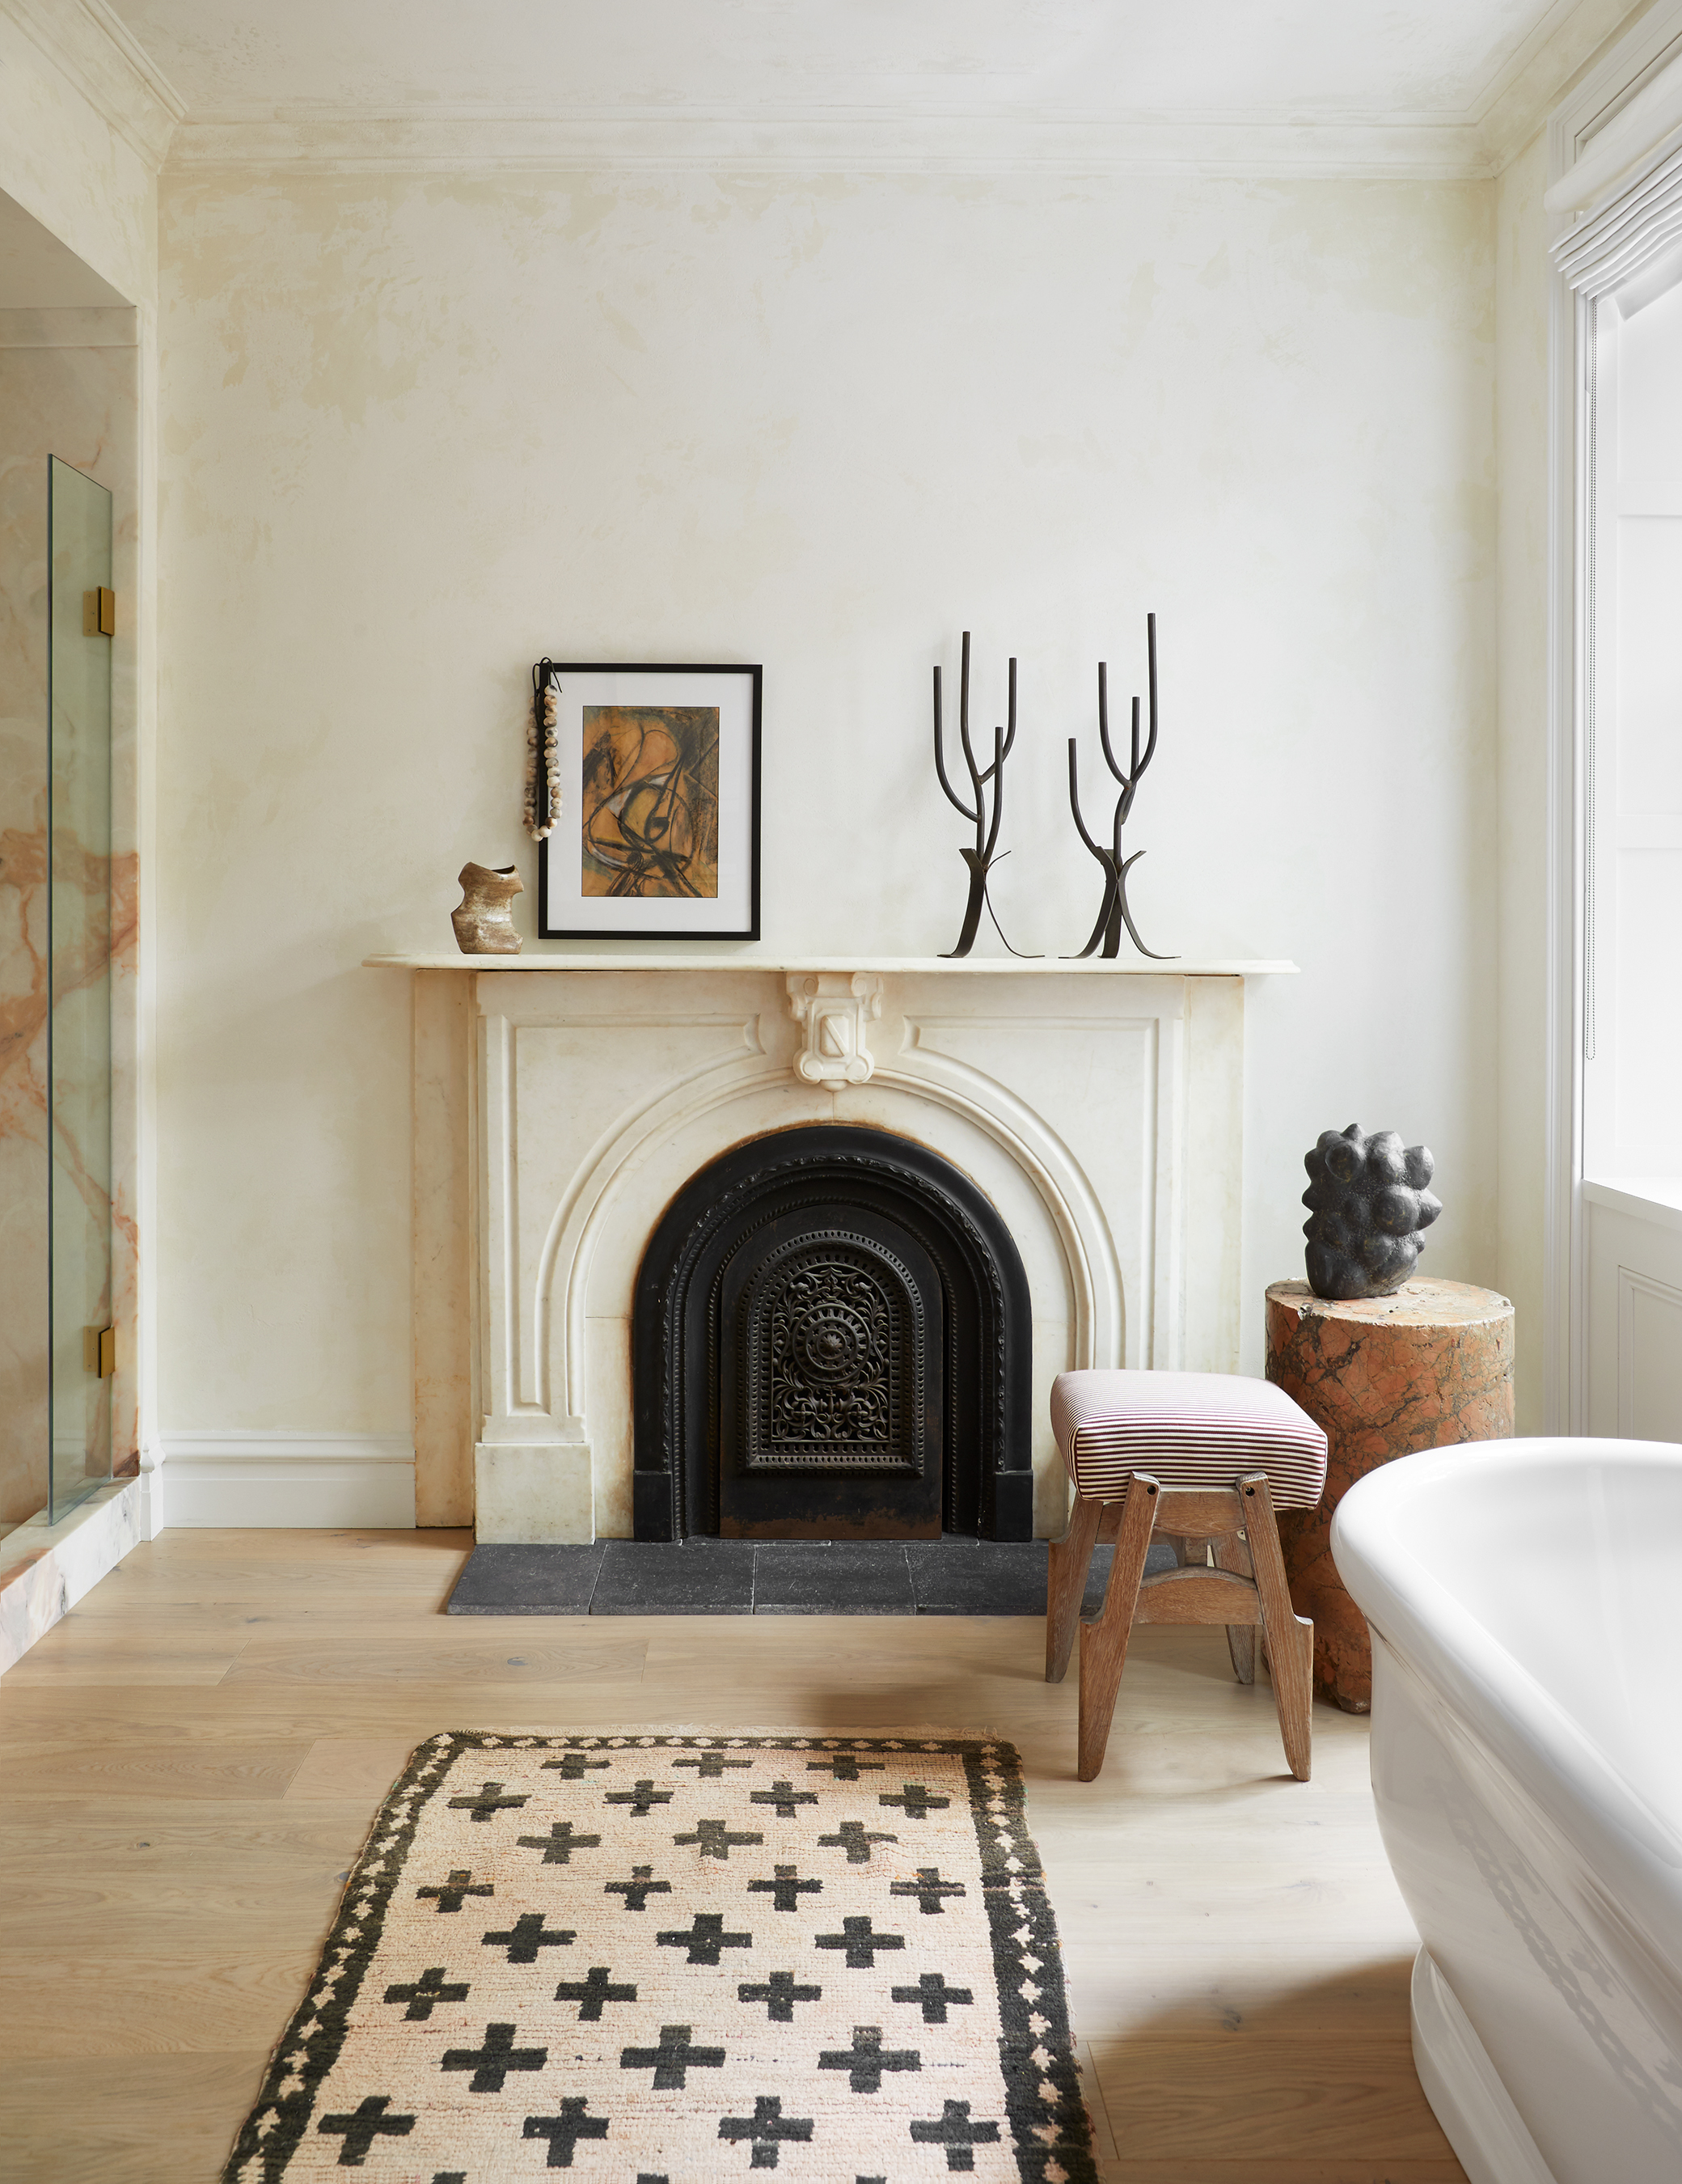
3. Choose bathroom art that blends with your color scheme

An example of bathroom art ideas showing a neutral bathroom with a fireplace and a monochrome rug

Bathroom designed by Athena Calderone/Image by Gieves Anderson.

(Image credit: Athena Calderone)

For a harmonious feel, choose or commission artwork that will blend well with your bathroom color ideas.

Brooklyn-based interior designer, author and creative director, Athena Calderone has done just this and the rusty tones and free-hand nature of the painting are mimicked in the marble block by the window.

Black frames stand out well on paler walls and give the artwork a dramatic edge, so use black elsewhere to link it through the scheme. Look out for architectural pieces to add a further dimension.

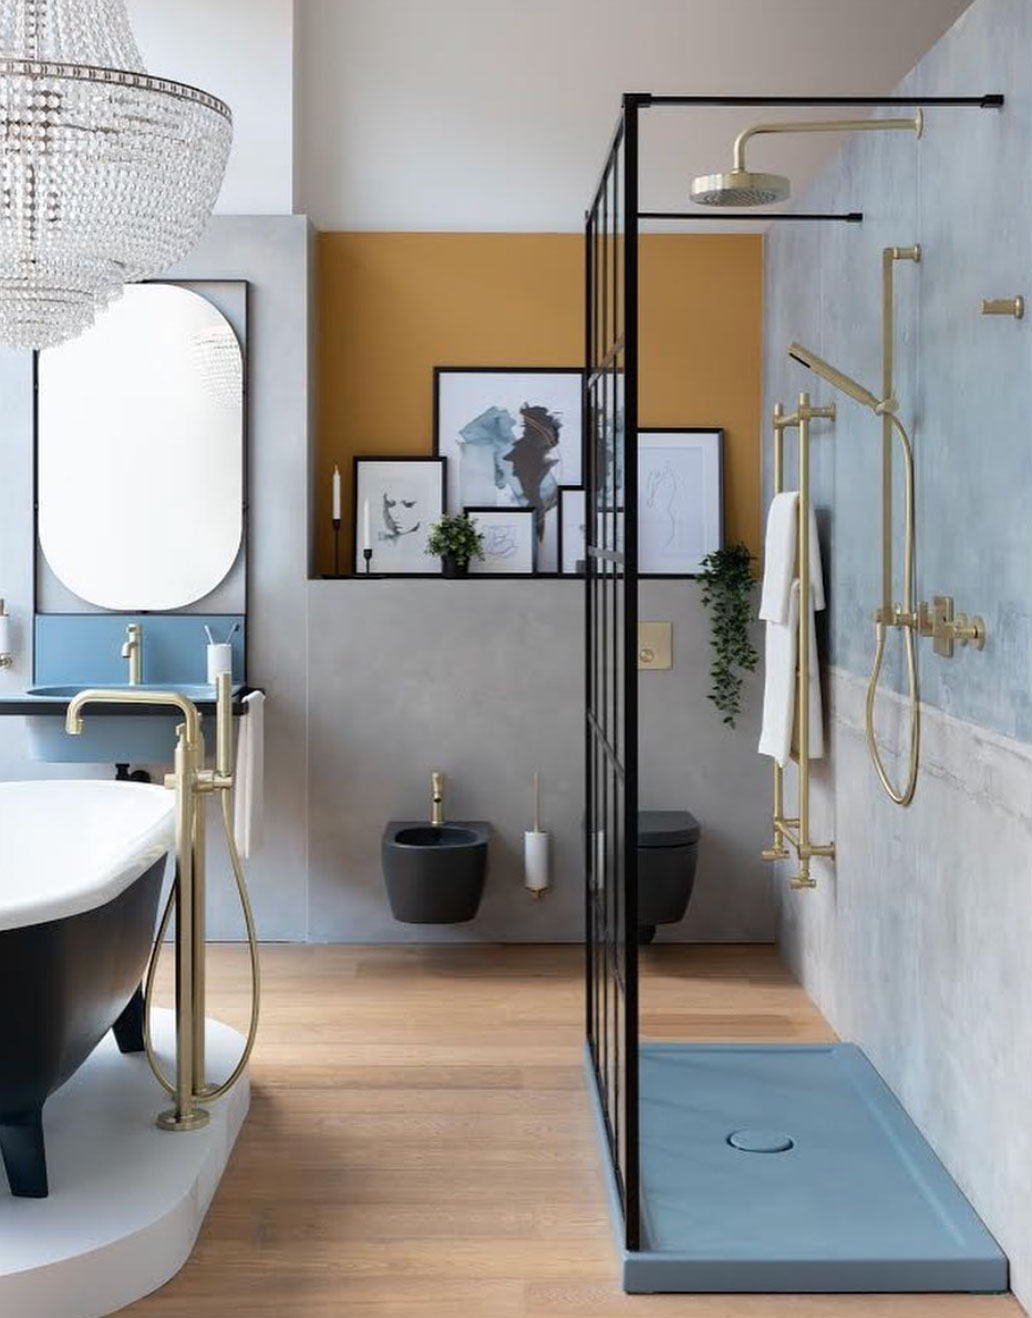
4. Frame bathroom art with a bold wall color

A bathroom featuring a black free-standing tub, a walk in shower, and a large chandelier

(Image credit: CP Hart)

Bold bathroom paint ideas might be tempting, but painting walls in daring shades should always be done with caution if natural daylight is poor, since the tones cast around the room by the wall color can create unflattering reflections.

However, painting a section of an accent wall to frame art is a wonderful way of showing off a collection, as in this bathroom designed by CP Hart.

5. Choose illustrative bathroom art

An example of bathroom art ideas showing a large white double vanity below two wall mirrors and next to a swan wall mural

(Image credit: Martin Moore)

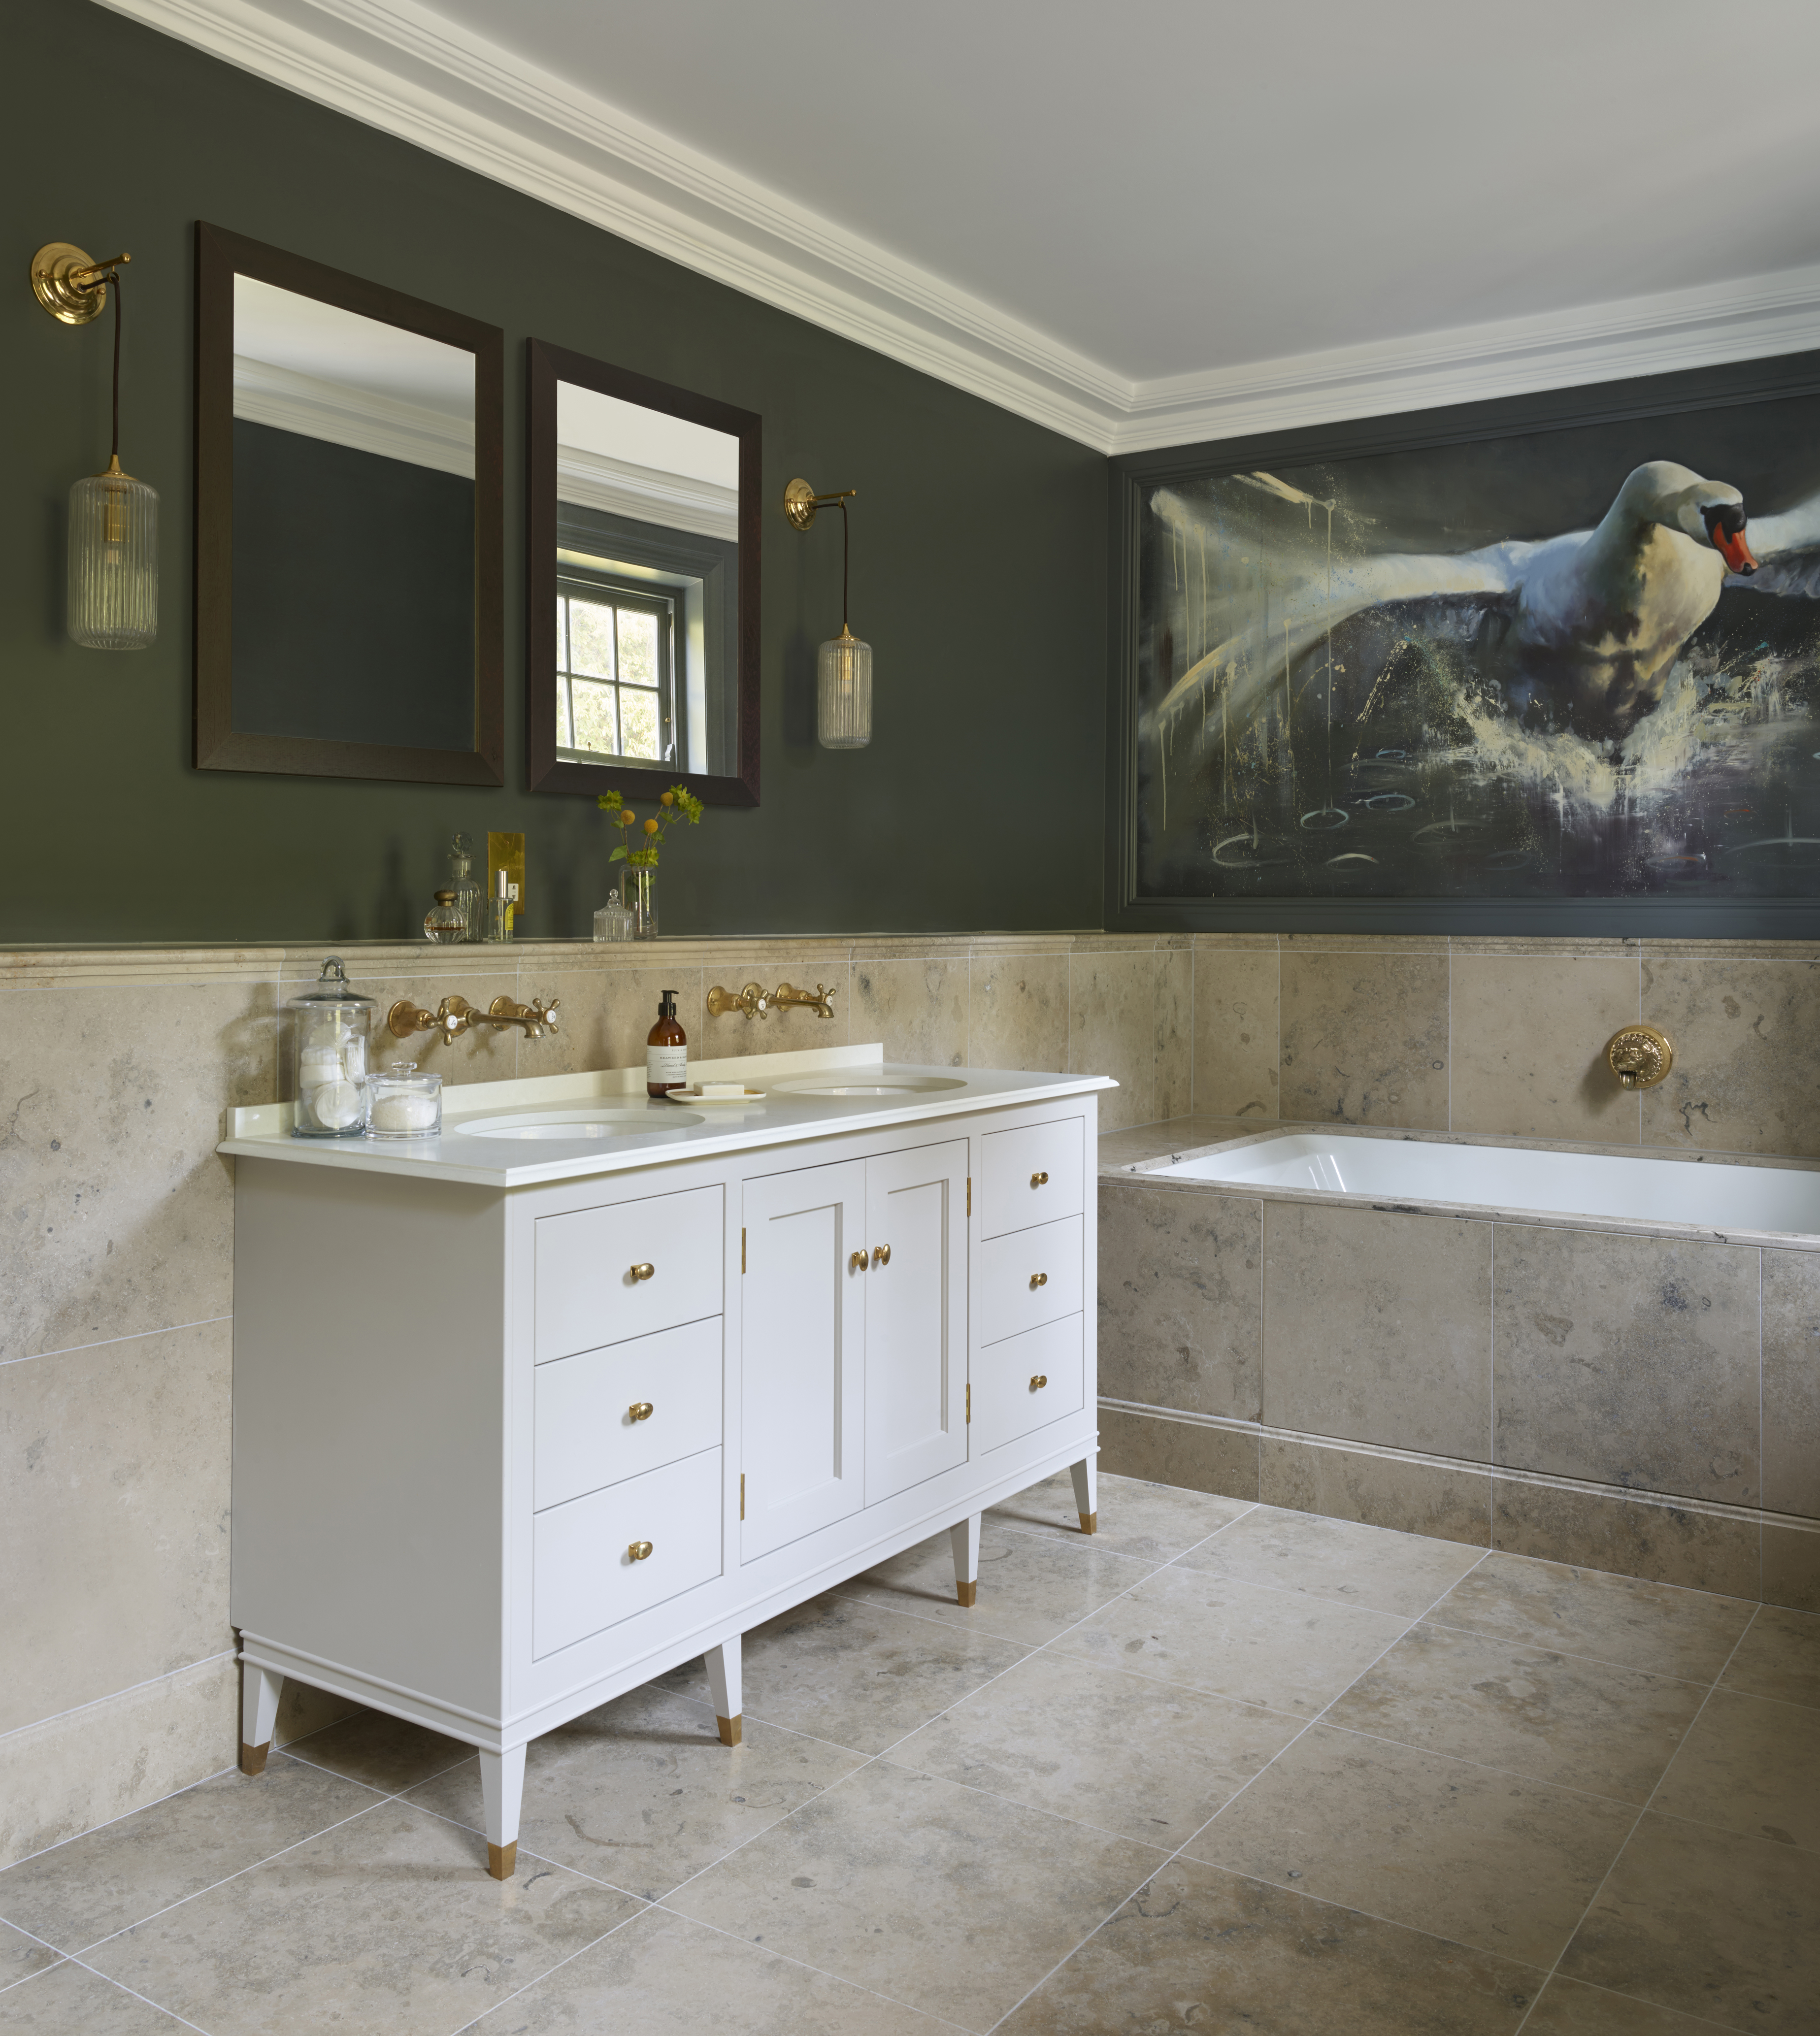
Whatever style of artwork you love the most should be what you choose – take this stunning illustrative bathroom wall idea as an example.

It shows that you don't need to pick a painting to hang, you could ask an artist to paint directly on your wall to fit the space.

The larger the artwork, the more of a focal point it will have, so bear that in mind when considering bathroom layout ideas. Go big if you want to make a statement, or smaller if you want it to integrate more with your scheme.

Cabinetry by Martin Moore; brassware and lights, Drummonds.

6. Design a scheme around existing artwork

This gorgeous, sunny children's bathroom by Salvesen Graham was designed – according to the client's brief – to be 'fun, practical, inexpensive'.

As they explain, 'The yellow from the client's existing artwork became a fun accent running through the room and you can't help but feel cheerful in here. We love a painted floor and they work well in a bathroom for people who don't want a cold hard finish but find carpet a problem.'

Credits: @archdigest for the feature; @clairebingham_design for the words; @simonbrownphotography for the pictures; @aureliaskincare, client.

For the ultimate in luxury – and complete with amazing artwork – be inspired by this fabulous master bedroom (and what a bath!) at Nomad London designed by New York based interior design studio Roman & Williams.

The aim was to create a space that's 'domestic, romantic and true' and to incorporate the artistic and cultural connection between London and New York.

What is interesting is how they have played with the scale of the paintings and the placement. You don't need to hang all artwork. Sometimes simply leaning a huge piece up against the wall is a statement in itself.

Image: Simon Upton

What kind of art is good for a bathroom?

When choosing artwork for a bathroom – and deciding what will work best – the key isn't necessarily in its looks.

All art is good for a bathroom – from prints, to photographs, to paintings, to wallhangings and even sculpture.

However, you need to assess whether the art you have chosen for your bathroom will withstand the moisture in the room. If the bathroom is poorly ventilated, bathroom art can warp and even become covered in mould and mildew.

What not to do when hanging art in a bathroom

  1. Don't hang anything very expensive – if you are at all worried about the humidity or fluctuating temperatures in a bathroom, stick to cheaper pieces of work that you can afford to lose long-term.
  2. Don't hang art in a poorly ventilated room – an exhaust or extractor fan is a must in a room that becomes very steamy (so particularly one with a shower); failing that, ensure you open windows to air the room, and leave the bathroom door open after you've used the bathroom.
  3. Don't hang art in a frame that doesn't like moisture – it's not just the art that won't enjoy the moisture. Wooden frames are likely to warp, so ensure the material you pick is at least water-tolerant. Similarly, acrylic will allow the artwork to breathe more than glass, and is less likely to crack or break.
  4. Don't be limited – it's unlikely that your bathroom will host that many guests, especially if you have a guest bath, so choose bathroom art that you love, and not ones designed to please others.

Bathroom Art Work

Source: https://www.homesandgardens.com/news/bathroom-art-ideas

Share:

Sunday, December 5, 2021

Large Flat Bathroom Mirror

Large Flat Bathroom Mirror

  • Filter Results

  • artis-ferro-double-door-stainless-steel-mirror-cabinet-600-x-670mm

    Best Seller!

    Artis Ferro Double Door Stainless Steel Mirror Cabinet 600 x 670mm

  • artis-ocel-single-door-stainless-steel-mirror-cabinet-400-x-600mm

    Artis Ocel Single Door Stainless Steel Mirror Cabinet 600 x 400mm

  • artis-dur-single-door-corner-stainless-steel-mirror-cabinet-300-x-600mm

    Artis Dur Single Door Corner Stainless Steel Mirror Cabinet 600 x 300mm

  • artis-teras-sliding-door-stainless-steel-mirror-cabinet-460-x-660mm

    Artis Teras Sliding Door Stainless Steel Mirror Cabinet 660 x 460mm

  • artis-acero-triple-door-stainless-steel-mirror-cabinet-600-x-900mm

    Artis Acero Triple Door Stainless Steel Mirror Cabinet 900 x 600mm

  • artis-stalo-tall-stainless-steel-mirror-cabinet-300-x-900mm

    Artis Stalo Tall Single Door Stainless Steel Mirror Cabinet 900 x 300mm

  • artis-ocel-single-door-stainless-steel-mirror-cabinet-300-x-500mm

    Artis Ocel Single Door Stainless Steel Mirror Cabinet 500 x 300mm

  • vasari-hexagonal-brushed-brass-framed-bathroom-mirror-750-x-500mm

    Vasari Hexagonal Brushed Brass Framed Bathroom Mirror 750 x 500mm

  • vasari-rectangular-black-framed-bathroom-mirror-700-x-500mm

    Vasari Rectangular Black Framed Bathroom Mirror 700 x 500mm

  • alpine-niveus-bevelled-edge-bathroom-mirror-500-x-700mm

    Alpine Niveus Rectangular Bevelled Edge Bathroom Mirror 700 x 500mm

  • artis-ferro-double-door-stainless-steel-mirror-cabinet-800-x-700mm

    Artis Ferro Double Door Stainless Steel Mirror Cabinet 800 x 700mm

  • alpine-lucis-bevelled-edge-bathroom-mirror-with-glass-shelf-500-x-700mm

    Alpine Lucis Rectangular Bevelled Edge Bathroom Mirror with Glass Shelf 700 x 500mm

  • alpine-specto-bevelled-edge-bathroom-mirror-500-x-700mm

    Alpine Specto Rectangular Bevelled Edge Bathroom Mirror 700 x 500mm

  • alpine-specto-bevelled-edge-bathroom-mirror-450-x-600mm

    Alpine Specto Rectangular Bevelled Edge Bathroom Mirror 600 x 450mm

  • alpine-niveus-bevelled-edge-bathroom-mirror-450-x-300mm

    Alpine Niveus Rectangular Bevelled Edge Bathroom Mirror 450 x 300mm

  • rak-gemini-double-door-aluminium-mirror-cabinet-700-x-1200mm

    RAK Gemini Triple Door Aluminium Mirror Cabinet 700 x 1200mm

  • vasari-hexagonal-black-framed-bathroom-mirror-750-x-500mm

    Vasari Hexagonal Black Framed Bathroom Mirror 750 x 500mm

  • vasari-rectangular-brushed-brass-framed-bathroom-mirror-700-x-500mm

    Vasari Rectangular Brushed Brass Framed Bathroom Mirror 700 x 500mm

  • vasari-rectangular-bevelled-edge-bathroom-mirror-800-x-500mm

    Vasari Rectangular Bevelled Edge Bathroom Mirror 800 x 500mm

  • artis-acciaio-single-door-round-edge-stainless-steel-mirror-cabinet-450-x-600mm

    Artis Acciaio Single Door Round Edge Stainless Steel Mirror Cabinet 450 x 600mm

  • alpine-claro-bevelled-edge-bathroom-mirror-500-x-700mm

    Alpine Claro Rectangular Bevelled Edge Bathroom Mirror 700 x 500mm

  • alpine-specto-bevelled-edge-bathroom-mirror-650-x-900mm

    Alpine Specto Rectangular Bevelled Edge Bathroom Mirror 900 x 650mm

  • rak-gemini-single-door-aluminium-mirror-cabinet-700-x-500mm

    RAK Gemini Single Door Aluminium Mirror Cabinet 700 x 500mm

  • vasari-rectangular-bevelled-edge-bathroom-mirror-900-x-600mm

    Vasari Rectangular Bevelled Edge Bathroom Mirror 900 x 600mm

  • vasari-capsule-polished-edge-bathroom-mirror-500-x-1000mm

    Vasari Oval Polished Edge Bathroom Mirror 500 x 1000mm

  • vasari-hexagonal-brushed-brass-framed-bathroom-mirror-750-x-500mm

    Vasari Hexagonal Brushed Brass Framed Bathroom Mirror 750 x 500mm

  • rak-gemini-double-door-aluminium-mirror-cabinet-700-x-800mm

    RAK Gemini Double Door Aluminium Mirror Cabinet 600 x 700mm

  • vasari-square-bevelled-edge-bathroom-mirror-700-x-700mm

    Vasari Square Bevelled Edge Bathroom Mirror 700 x 700mm

  • rak-joy-rectangular-bathroom-mirror-682-x-1200mm

    RAK Joy Rectangular Bathroom Mirror 682 x 1200mm

  • rak-joy-triple-door-mirror-cabinet-682-x-800mm

    RAK Joy Triple Door Mirror Cabinet 682 x 1000mm

  • vasari-rectangular-bevelled-edge-bathroom-mirror-700-x-1200mm

    Vasari Rectangular Bevelled Edge Bathroom Mirror 700 x 1200mm

  • artis-ocel-single-door-stainless-steel-mirror-cabinet-500-x-700mm

    Artis Ocel Single Door Stainless Steel Mirror Cabinet 500 x 700mm

  • vasari-gala-polished-edge-bathroom-mirror-500-x-800mm

    Vasari Rounded Polished Edge Bathroom Mirror 800 x 500mm

  • Large Flat Bathroom Mirror

    Source: https://www.plumbworld.co.uk/standard-rectangular-bathroom-mirrors-18158-0000

    Share:

    False Ceiling Designs For Small Bathroom

    False Ceiling Designs For Small Bathroom

    What Are Some Design Ideas for Small Bathrooms?

    Photo Courtesy: NelleG/E+/Getty Images

    Redecorating the rooms in your home can bring some chaos, but it also brings a lot of excitement as you watch an entirely new look come to life in rooms that had become mundane and dated. The long-term enjoyment and satisfaction you get from a newly redesigned bathroom, for example, is more than worth the short amount of time you spend completing the work.

    When you're decorating a particularly small bathroom — or any small room — you have to make the most of every bit of available space. From creating practical spaces to letting your design imagination shine through, you could take your new bathroom in many different directions. Let's take a look at some great design ideas for small bathrooms.

    Go Bold with Wallpaper

    Wallpaper may seem like a dated idea, but many of today's modern prints and designs look nothing like those blocky, geometric designs from days gone by. Bold prints and striking patterns that might look overwhelming in a larger space can really shine in a small bathroom. Choose an accent wall and decorate it with bright colors or a punchy pattern or go dramatic and wallpaper the entire bathroom in a textured print.

    Photo Courtesy: Tracy A. Woodward/The Washington Post/Getty Images

    Keep Counter Lines Clean

    If you have an ample budget, changing your bathroom counter can really change the entire feel of the bathroom. Choose a design that adds crisp, clean lines to the space. Decorative finishes and scalloped edges may seem fancy and tempting, but they can distract from the rest of the room and diminish your counter space. Additionally, patterned designs on the walls call for "non-busy" counters and accessories to avoid a cluttered feel.

    Photo Courtesy: FluxFactory/E+/Getty Images

    Add a Design Element to the Ceiling

    If decorating the walls isn't your style or you don't have a lot of open wall space, consider adding an eye-catching design element to the ceiling instead. Drawing visitors' eyes up to the ceiling helps create the illusion that your overall bathroom space is much larger than it actually is, according to Elle Decor.

    Photo Courtesy: David Papazian/Corbis/Getty Images

    Consider a Floating Sink

    Okay, so maybe floating sinks don't really float, but these types of pedestal sinks with no surrounding counters almost give the impression they are really suspended in midair. This sink style allows you to eliminate bulky counters and cabinets by skipping the traditional bathroom vanity. If counter space isn't important to you, look for a modern floating sink with minimal plumbing to keep your walls and floor tidy.

    Photo Courtesy: John Lovette/Photographer's Choice RF/Getty Images

    Think Outside the Shower Stall

    Traditional shower stalls and bathtubs take up a lot of valuable space in a tiny bathroom. If you've got the budget for a full replacement, consider turning your standard bathroom into a European-style bathroom with an open shower and drain on one end of the room, partially separated by a transparent sheet of laminated glass.

    Photo Courtesy: Onzeg/E+/Getty Images

    Try Hanging a Towel Bar

    If you plan on keeping the counter and you need more counter space, hang a towel bar (or two) to free up space. These bars can hold standard hand towels or even full-size body towels in most cases. This use of vertical storage space saves some of your limited square footage for other uses. As a bonus, you can find plenty of towel bars with decorative designs to spruce up your walls as well.

    Photo Courtesy: Comstock Images/Stockbyte/Getty Images

    Bring Some Natural Light In

    One of the biggest problems in a small space is the lack of light, and dark rooms with poor lighting look not only dismal but also seem much smaller than they actually are. If your bathroom has a window, install decorative blinds or a window shade in a color and material that lets some natural light in, even when the blinds are closed or the shade is pulled down.

    Photo Courtesy: Catherine Falls Commercial/Moment/Getty Images

    Spring for an Oval Mirror

    You know how funhouses always have halls and rooms with funky mirrors in them? The logic is simple — mirrors are great at creating optical illusions. Oval mirrors, in particular, create an illusion of height, and every mirror reflects both artificial and natural light to make rooms much brighter. Place an oval mirror over the sink or an open wall to add brightness and create the illusion of extra height in your small bathroom.

    Photo Courtesy: tulcarion/E+/Getty Images

    Use Ledges or Shelves for Storage

    If you're completely remodeling your small bathroom, consider choosing a shower and tub enclosure with storage ledges in the walls. If your do-over isn't that extensive, you could hang shelves in the shower enclosure or above the sink. Ledges and shelves are great for storing shower and hair products that you don't want cluttering your counters.

    Photo Courtesy: Image Source/Getty Images

    Choose Flexible Storage Options

    As much as you want to avoid clutter in a small bathroom, it's inevitable that you need certain items in the room. The storage items you choose are determined by the style choices you make throughout the room. If you opt for a pedestal sink, you might be able to slide a basket with fresh towels underneath it. If your shower doesn't have shelves, then look for a hanging shower caddy to drape over the shower head to hold your supplies. If you hang a shelf near your sink, pick up some cute containers to place on it to hold your toothbrush, toothpaste, hairbrush and other essentials.

    Photo Courtesy: MIXA/Getty Images

    More From QuestionsAnswered.net

    False Ceiling Designs For Small Bathroom

    Source: https://www.questionsanswered.net/lifestyle/10-design-ideas-small-bathrooms?utm_content=params%3Ao%3D740012%26ad%3DdirN%26qo%3DserpIndex

    Share:

    Saturday, December 4, 2021

    Bathroom Niche Dimensions

    Bathroom Niche Dimensions

    Shower niches are very convenient, especially for small bathrooms. It provides an easy and convenient way to store shampoo bottles, lotions and other things and they eliminate the need for shower caddies and racks.

    Shower Niche

    This ensures a clean and simple overall design and structure which suits most modern and contemporary bathrooms. One question rises however: what's the right height for a shower or a bathtub niche? Find out the answer below.

    What Is a Shower Niche?

    Similar to a cubbyhole, a shower niche is a storage area with an open-space design that is put within the wall of your tub or shower area and utilized to store all of your bathroom stuff.

    Not only are niches used in showers, but they can also be used in bathtub surrounds. They are an organized and simple method to store your often used bathing goods.

    Those that share a bathroom will understand the problem of maintaining sufficient space for everyone's bathroom requirements without creating a major mess.

    Perhaps you've incorporated a shelf or a shower caddy into your shower or tub area to create additional space. However, shelves and shower caddies can be difficult to clean, are bulky, and contribute to the appearance of a cluttered shower. Due to the amount of moisture and water in your bathroom, metal fixtures will rust with time.

    A shower niche is a far superior solution that is quite inexpensive. It's a very useful feature that allows you to store your shower accessories properly without turning to organizers that take up valuable space. Everyday shower objects can be concealed within the shower's wall.

    Install Mistakes When Installing a Shower Niche View in gallery

    Install Mistakes When Installing a Shower Niche

    Installing a shower niche is more complex compared to just hanging an organizer in your bathing area. That's why people are more likely to make mistakes, which is why we wanted to showcase the most common mistakes, why they happen, and how they can be avoided.

    Mistake: You don't install a waterproofing membrane.

    Explanation: To prevent making this critical shower niche installation error, you must select a shower niche that includes an integrated flange which is added for waterproofing. This particular component is important because you want the shower wall waterproofing membrane to stay intact.

    Mistake: You installed the niche in an outside wall.

    Explanation: This installation is frequently a major shower niche installation mistake, as moisture can readily collect behind your niche if not done properly. In general, it is always better to construct your shower niche in a wall that is not exposed to the outside.

    The issue is that the shower environment is quite damp, and this means that moisture will always find its way into the stud cavity via the wall tile, the tile backer board, and frequently via the tiled shower niche.

    Mistake: You're compromising the wall structure.

    Explanation: Another common shower niche installation error is the building of a custom horizontal tiled niche that threatens the shower wall's structural stability.

    If you're tackling the idea of installing or building a niche in your shower, you've probably seen numerous instances of this type of niche. These horizontal recesses epitomize richness, frequently extending the full shower wall and providing an enormous amount of storage space.

    In spite of the existence of a method for properly and safely installing these shower niches, many contractors don't do it. Most excellent contractors will assert that properly framing the niche will effectively reinforce the structure.

    The issue is that these solutions often address structural pressures exerted from above, but rarely address the increased flexibility (decreased stiffness) induced by eliminating the vertical framing.

    Mistake: You're not choosing a custom-fit shower niche.

    Explanation: If you choose to install a pre-manufactured or finished shower niche rather than a custom-built one, you may avoid committing another shower niche installation mistake by avoiding retrofit shower niches. The design of a retrofit niche allows it to be inserted after the shower wall tile has been put and grouted.

    While this appears to be a slightly easier method of installing a shower niche, it is not significantly easier compared to what it takes to install the membrane bonding finished shower niche items now available, and it violates industry-recommended "best practices."

    Mistake: You skip the waterproofing part.

    Explanation: If you intend to build a custom shower niche and wish to prevent one of the most common shower niche installation errors, you must ensure that you or your contractor does not overlook the waterproofing phase. When a bespoke niche is constructed properly, it might appear to be quite substantial, solid, and waterproof.

    Even if the joints appear to be tight in a newly created niche, they will not prevent water from infiltrating and flowing into the stud cavity if the niche is not properly waterproofed. It makes no difference whether you or your contractor utilizes a sheet or liquid waterproofing membrane, as long as this critical step is not skipped during your future shower remodel!

    How to Build a DIY Shower Niche

    How to Build a DIY Shower Niche View in gallery

    A DIY shower niche is a time-consuming project, but it isn't a complicated one at all. Below is a list with the materials needed for the project, as well as the steps that will lead you towards completion.

    What you'll need:

    • A multi-tool
    • Framing wood
    • Tiling supplies
    • ½-inch cement board
    • Tape measure
    • Cement board tape
    • Utility knife
    • Thin set
    • Miter saw
    • Waterproofing membrane
    • Screws
    • Tiles
    • Spacers

    Step One: Measuring the tiles

    Arrange your tiles on a flat surface and add spacers to the height at which you want your niche to begin. Then, using a straight board, measure and mark the beginning and end of each tile.

    Step Two: Sizing the niche

    You need to know how big your niche will be. Once you have the correct measurements, you can build it using 2-by-4s.

    Step Three: Fitting the niche in the studs

    Using plywood, you can secure the niche in the studs using screws. With the multi-tool, you can cut the bottom side of the cement board for a snug fit.

    Step Four: Adding cement board

    You want to attach the cement board to all the sides of the niche, so make sure that you measure and cut it accordingly. You first have to place the top boards and shelves, and then flush with the cement board to the wall.

    Step Five: Sloping the shelf

    You want to do this so that water will run off. To do this, you can add a row of spacers to the back and then use screws to place the cement board on top.

    Step Six: Making finishing touches

    Finishing the niche means you're going to have to cover all the joints using tape, seal them with special sealant, let them dry, sand them, and then paint the waterproofing membrane on top.

    Step Seven: Tiling the niche

    Tiling your niche will ensure that it blends in with the rest of your bathroom look.

    Shower Niche Design Ideas

    Marble Shower Niche with Three Shelves

    Marble Shower Niche with Three Shelves View in gallery

    The ideal height of a shower niche is at chest to eye level when standing. However, that's strictly related to the height of each individual person. On average that usually means a height of 48 to 60 inches (120-150 cm).{foudn on janinedowling}.

    Glass Panels for Shower

    Glass Panels for Shower View in gallery

    It's not the height at which you position the shower niche that's important but also the proportions of the niche itself. That in turn depends on what you plan to use the niche for specifically. This suite by LA Closet Design is a good source of inspiration.

    Black Shower Fixtures

    Black Shower Fixtures View in gallery

    Make sure the shower niche suits your needs. It doesn't need to be very high if you only plan on keeping a few small bottles of shampoo or lotion in there anyway and it doesn't need to be extra wide if you don't need it to be. This design by GIA renovations is very well balanced in this sense.

    LED light for the shower niche

    LED light for the shower niche View in gallery

    A bathtub niche of course needs to be placed lower so you can easily reach it while in the tub. That means placing it just a bit higher than the tub and in a place where it's easily accessible. This bathroom by Cartelle Design can give you some inspiration.

    Porcelain tiles

    Porcelain tiles View in gallery

    There's no standard shape or size for a shower niche which means you can customize it in any way you see fit. For example, this one has an irregular design, being long and narrow for the most part but also including a tall section. It was designed by First Lamp.

    Chevron tiles for bathroom

    Chevron tiles for bathroom View in gallery

    Another cool idea is to add a shelf on your shower niche in order to basically divide into two sections. This could make it easier to organize your toiletries and other things.

    Honeycomb shower niche

    Honeycomb shower niche View in gallery

    The best thing about a shower niche is that it's embedded into the wall. That helps save space and also means you can get pretty creative with the design. Check out this stylish flower-shaped niche shared by warmyourfloor on Instagram. It looks amazing.

    Subway Tiles Shower Niche

    Subway Tiles Shower Niche View in gallery

    When building or designing the shower niche you can use the wall tiles as a guide. This way the niche can fit in nicely without disturbing the pattern. Of course, the ideal height should be a priority. Check out this beautiful design shared by dettmore101 for inspiration.

    Mosaic Large Walk In Shower With Niche

    Mosaic Large Walk In Shower With Niche View in gallery

    It's usually a good idea to have the niche on a wall that's opposite or adjacent to the shower head so you can access the items without reaching through the shower spray. In this particular the niche goes from end to end.

    Marble shower niche with led lights

    Marble shower niche with led lights View in gallery

    There's plenty you can do to customize a shower niche and to make it stand out, including to add accent lighting to it. Built-in LED lights can illuminate the niche in a really cool way, creating a nice glow and adding character to the entire bathroom. Check out trendir for more great lighting ideas.

    Black Frame for Shower Glass

    Black Frame for Shower Glass View in gallery

    Another cool way to make the shower niche stand out from a visual point of view is by using materials, finishes and colors that contrast with the surrounding wall. A good example in this regard is the design created by studio Biasol.

    Walk-in shower With Glass Shelves For The Niche

    Walk-in shower With Glass Shelves For The Niche View in gallery

    Getting back to the initial question (what's the right height for a shower niche), we also want to mention that the proportions and the design are very important in this case. Studio ONE SEED Architecture + Interiors created here a tall and narrow niche with three levels. All three should be easy to reach which means the center the of niche is probably places at the ideal height.

    Bathroom Niche Dimensions

    Source: https://www.homedit.com/shower-niche-height/

    Share:
     
    banner